Friday, August 24, 2012

Cantaloupe Freezer Jam

I keep hearing about cantaloupe jam and how good it is.  Cantaloupe is one of my favorite things to eat in the summer, so naturally, making jam out of it intrigued me.  I looked at what seemed like 30 recipes before I picked one that I wanted to try.  Several of the recipes called for the use of a vanilla bean, but I was just too tight to pay $8.99 for four of them, when the recipe only called for one.

Now some of you might be thinking, "ick cantaloupe jam," and others might be saying, "hmmm, cantaloupe jam."  I have to tell you, it is actually pretty good.


To begin, pick a nice size cantaloupe that is not overly ripe.


Cut the cantaloupe up.  I cut it in long pieces first.


Then I diced it into cubed pieces.  After testing a few pieces of the cantaloupe (I had to make sure it tasted good), you should come up with approximately 4 cups of cantaloupe.

Next, put the cantaloupe in a pot.


Then add 1/4 cup of freshly squeezed lemon juice (approximately 1 1/2 lemons). 


Bring the two ingredients to a boil, mashing the cantaloupe the entire time.


Once it begins to boil, add 1 package of Low or No-Sugar Needed Pectin stirring all the while.  Once the mixture comes to a hard boil again, add 3-4 cups of sugar.  I wanted mine a little sweeter, so I added the 4 cups.


After adding the sugar, let the mixture boil hard for about 5 minutes, continue stirring the entire time.

Take mixture off of the stove and let cool for about 5 minutes.


Ladle into freezer containers, let cool completely and then store in the freezer.  I use the 8 oz Ball Freezer Containers.  The little dish on the right is what I served with my 7-Up biscuits.  It was delicious!
Keeps up to one year in the freezer.

Thursday, August 23, 2012

7-Up Biscuits

I've been eyeballing a recipe on Pinterest for 7-Up Biscuits.  I remember eating these when I was little, but I haven't heard about them in awhile.  So, tonight I decided to try my hand at them and see how they turned out.


To make 7-Up biscuits, you need a medium size bowl.
Add 2 cups of Bisquick mix


Next, add 1/2 cup of sour cream.


Cut the sour cream into the biscuit mix.


Add 1/2 cup of 7-Up to the mixture.  This will make a very soft dough.
Sprinkle additional Bisquick mix on a flat surface (counter, table, cutting board, etc) and pat dough out. 
Melt 1/4 cup butter in a 9"square pan.


Place cut biscuits in pan and bake at 450 degrees until golden brown (about 10 minutes).


These biscuits are moist and buttery.  They do have a slight 7-Up twang to them, but my husband thought they were great.  He told me it'd be alright if I wanted to make them again.  I served them with a warm batch of cantaloupe jam that I had just made.  That recipe will be on here tomorrow for you to try and enjoy!

Recipe for 7-Up Biscuits
2 cups of Bisquick mix
1/2 cup sour cream
1/2 cup 7-Up
1/4 cup melted butter

Cut sour cream into Bisquick mix, add 7-Up.  This will make a very soft dough.
Sprinkle additional Bisquick mix on a flat surface and pat dough out. 
Melt 1/4 cup butter in a 9" square pan.
Place cut biscuits in pan and bake at 450 degrees until golden brown (about 10 minutes).
Serve with butter and jam...yummy!!!

Wednesday, August 22, 2012

Those Golden Arches

Everyone, especially children, seem to love the "golden arches."
Okay, I normally don't like to eat at McDonald's, but when I do, I find myself ordering the same thing, especially if it's breakfast.  I'm hooked on the bacon, egg and cheese bagel.  I don't care for the hashbrown, but I could eat that breakfast sandwich daily.  Additionally, I find myself ordering a small mocha frappe as my drink.  With the rise of coffee houses like Starbucks, McDonald's had to keep up, and now they have their own line of specialty coffees which aren't too bad.

Our little community of New Castle use to have a Starbucks, but we are all so poor, that we couldn't support it like their company thought we should, so it closed.  Realistacally, I only pay $4 for a cup of coffee if I'm on vacation and even then, I am tight with my money.  My husband says that I am so tight I squeak...is that a good or a bad thing?


Since I love coffee and drink it on a regualr basis (thus the purchase of my Keurig a while back), I have become addicted to the mocha frappe from McDonald's.  It's my new addiction.  It is the perfect blend of mocha, chocolate and whip cream.  I think it might even be sinful (I'm kidding).  The only thing I caution on this drink is that if you drink it too quickly, you will get a brain freeze every time.  My dad stayed with us about a week ago and said he loved this drink as well.  Guess the taste buds run in the family.  The coffee taste really isn't that strong, but if you haven't tried it, I would bet you might like it!

Tuesday, August 21, 2012

Where Did Summer Go?

Summer is the busiest time of the year for me personally.  With my job, we are gearing up for the local 4-H fair and then the state fair.  The month of July and August are mostly a blur.  We did get our living room and dining room remodeled but I haven't had time to go through things to put items back on the wall or shelves.  I was just relieved to have the rooms done and a place to sit back down.  The county school's have started a year-round schedule, so the student's went back to school, the first week of August.  I remember starting school in September.  Where did the summer go?

On Sunday, we had the "Reeves" Family Reunion, which is Bill's mom's side of the family.  The weather was perfect and the food, of course, was magnificent.  I don't think that families have reunions much anymore, which is a shame.  Reunions were where I met cousins that I didn't know existed.  Where we played for what seemed like hours on end while the adults played cards and visited.  We ate, then we ate some more.  In today's world, I guess we are just to busy to have reunions.  People have all kinds of things in there schedules that prevent them from just "hanging out" with their family.  I encourage you, to GO to your family reunion if you have one.  I promise you won't regret it.

In the chair, is Bill's Great Aunt Ima.  She is 98 years old
and the only living sibling of Bill's grandfather.  She is talking
to her niece Bonnie Meyers.

Thursday, August 16, 2012

Canning Chili Base

I enjoy canning.  My mom always did it, but my mother-in-law was my true inspiration.  She took the time to teach me and show me exactly what to do.  Last night, we picked our first true batch of tomatoes and it was a whopper when you think about the drought we have had.


Bill, my husband didn't want me to process the tomatoes, but I knew I had enough for at least one batch of chili base, which I ran out of last year.  I started out getting all of the canning equipment out and washing it thoroughly.  Then, I got all of the pots and pans I would need along with the lids for the jars.  I was ready to begin.


I use the Mrs. Wages Chili Base packages.  You can make your own base, but the packages just make everything easy.  The first thing you want to do is scald your tomatoes in boiling water for about 3 minutes, or until the tomatoes have a split on the skin.


This is an example of the skin splitting.  This makes it easier to peel the skin off of the tomato.  After you take the tomato out of the boiling water, immediately put it in cold water so the tomato can cool down and you can remove the skin and core with ease.


After you have scalded all the tomatoes, let them cool, now you need to remove all the skin. 


Once the skins are removed, you want to puree the tomatoes in a blender until you have a smooth consistency.


Next, pour the tomato puree in a pot, add the chili base mix and two tablespoons of sugar. 


Bring to a boil and then let it simmer for 25 minutes or until you get a good solid thickness.


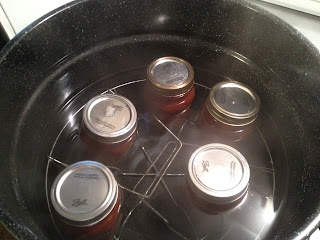
While the tomatoes are simmering, I get my water bath ready, as it takes a few minutes for the water to heat up, put the lids for the jars in a little bit of water and heat to a boil and put my quart size jars in the oven to heat up at 170 degrees. 


By the time your tomatoes are done simmering, everything else will be ready for processing.  Ladle the chili base in the jars, wipe the outside off, attach the lids and seal the jars, just not too tightly.


Finally, put the jars in the water bath, bring to a low rolling boil and process the jars for 40 minutes.  When they are done, put the jars on a towel and let cool so they will seal.  You will hear them go "ping" when they have sealed.

Always put the year on top of the jar along with what is in it.  Example:  Chili Base 2012.

And there you have it!  Not to hard to do!  There is nothing better than having homemade food in the winter.  Go ahead and try it!


Wednesday, August 8, 2012

That Old Farmhouse Appeal


I love having decorations on my table.  Finding simple ways to decorate (especially our newly remodeled living room and dining room) is fun for me.  I like country, primitive, vintage type items and I am really excited about the idea of remodeling my kitchen in the future...mostly for a dishwasher, but I want it to look like a traditional farmhouse kitchen.

I feel blessed to live in a farmhouse that has character and history to it and I love the idea of decorating in ways that highlight a primitive farmhouse era, with modern updates of course!  No outhouse for me!!! lol!

The great thing about decorating is that you DON"T have to spend a lot of money to do it.  In the picture above, I took an antique 4 gallon crock that I purchased at an estate sale for $10 and filled it with silk flowers and eucalyptus I purchased from Hobby Lobby for around $25.  The result - a beautiful centerpiece on my dining room table.  The table sits in a corner, so this centerpiece is a perfect fit for the table. 

Be sure to look around your house to get ideas on incorporating old and new items for that rustic feel to your home.

Tuesday, August 7, 2012

Bring on the Games


I used to love to play games...Scrabble, Connect Four, Yahtzee, cards!  In our house, we have some old games that we weren't going to do anything with, so I decided to decorate with them.

In the picture above, I took a 5x7" frame, cut out scrapbook paper to insert behind it and began coming up with words for my Scrabble blocks.  I decided there were enough letters to spell out our last name: McDonnell, the word "love" and both of our names, "Bill" and "Lis."  Once I had it all laid out, I took some tacky glue and glued the letters to the outside of the glass to create this cute little frame.

This was fun, simple and easy to do.


Next, I had a Chinese Checker board and I thought that it would look great just above my crocks on the wall.  So I took some Command adhesive for wall hangings and attached it to the back of the board and mounted it on the wall.  I was pleased with the display.

Do you have things in your house that you can use for decorating.  Recycling old items can be a lot of fun:)

Thursday, August 2, 2012

Cheese Potato & Smoked Sausage Casserole

Pinterest has become my new addiction.  I enjoy viewing and trying out the different crafts, recipes and home decor ideas that other people find.  If you are not familiar with the site, I highly recommend visiting it and setting up a profile.

Yesterday, I chose a recipe off of my "Foods to Eat" board and tried it out. When I make items off of Pinterest, I try to go back and make comments on them so others know what I think. 

This following recipe is a keeper! My husband actually said he would eat leftovers!  As you can see from the picture, it is extremely cheesy.  When I make it next time, I will cut the Velveeta portion in half.  It was almost to much cheese for me.  If you have children, I can see this being a favorite with them.

Jolean's Cheese Potato & Smoked Sausage Casserole
  • 3 cups potatoes, peeled, boiled and cut into cubes when cool, approx. 1 lb
  • 4 tablespoons butter
  • 4 tablespoons flour
  • 2 cups milk
  • 1/2 teaspoon salt
  • 1/4 teaspoon pepper
  • 1/2 lb Velveeta cheese, diced
  • 1/2 cup sharp cheddar cheese, shredded
  • 1 lb skinless smoked sausage
  • 1/8 teaspoon paprika

Directions:

  1. Cut skinless smoked sausage in half, lengthwise, and then chop into 1/2 inch "half moon" cuts. Cook in a frying pan for about 15 minutes, turning frequently to SLIGHTLY brown.
  2. Meanwhile, put cooked & diced potatoes in 2 quart casserole. Add cooked meat and give it a gentle toss.
  3. Mix all remaining ingredients (except for shredded cheddar cheese & the paprika) in a saucepan over medium heat until warm, melted and smooth. (Use a whisk and stir constantly.).
  4. Pour white/cheese sauce over potatoes and meat. Sprinkle shredded sharp cheddar cheese on top, and then sprinkle paprika evenly over the top.
  5. Bake in preheated 350°F oven for 35-45 minutes (watch, until golden brown on top).
  6.  


Wednesday, August 1, 2012

How to Freeze Sweet Corn

As I've said before, there is nothing better than sweet corn in the summer...except maybe eating it in the winter too.  Although it's not been the best growing season, we were still able to purchase several dozen ears and put them up for this winter.

The first thing you want to do is not to let the sweet corn lay around.  Once you purchase it, start processing it that same day if at all possible.  This will help to ensure that you get the best flavor and quality out of the corn.  I usually enlist my husband to shuck the ears and remove the silks, but today, it was all me. 

If you have never frozen sweet corn before, Purdue University Extension offers an excellent publication called, "Let's Preserve Sweet Corn" with step by step instructions.


After all the corn had been shucked and washed, I was ready to begin the process...and it can be a messy one!  I began with a pot of boiling water and inserted several ears of corn at a time.  I cooked them for approximately 4 minutes and then inserted the ears into cold ice water.  This process is known as blanching.

After the corn had cooled off, I placed the corn in my (sterile - I clean it thoroughly before I use it in this manner) dish drainer.


By doing this, it allows any excess water to run back down into the sink and doesn't delay my cooking process.  The dish drainer also works well because it will hold several dozen ears of corn at once.

Once you're done blanching the corn, it is time to cut it off of the cob.  This is where you will get messy, but oh is it worth it!  I used a knife today, but Pampered Chef makes a kernel cutter that does wonders as well.  I usually find that cutting the cob upside down is easier for me.  After the cob is clean of corn, take your knife and run it back over the empty cob being sure to get all the little extra flavorful portions out of the cob.

Next, it is time to fill your quart size freezer bags.  My mother-in-law, who I miss dearly when I am doing stuff like this, had this wonderful little gadget that I use to hold my freezer bags open.  If you don't have one, simply fill your bag the old fashioned way.


Once the bag is full, squeeze all of the air out of it and seal it.  Be sure to label the bags with at least the month and year of freezing the corn so it doesn't stay in your freezer for several years.

There you have it!  Simple, easy steps to freezing sweet corn!  The work is worth it in the winter time:)