I enjoy canning. My mom always did it, but my mother-in-law was my true inspiration. She took the time to teach me and show me exactly what to do. Last night, we picked our first true batch of tomatoes and it was a whopper when you think about the drought we have had.
Bill, my husband didn't want me to process the tomatoes, but I knew I had enough for at least one batch of chili base, which I ran out of last year. I started out getting all of the canning equipment out and washing it thoroughly. Then, I got all of the pots and pans I would need along with the lids for the jars. I was ready to begin.
I use the Mrs. Wages Chili Base packages. You can make your own base, but the packages just make everything easy. The first thing you want to do is scald your tomatoes in boiling water for about 3 minutes, or until the tomatoes have a split on the skin.
This is an example of the skin splitting. This makes it easier to peel the skin off of the tomato. After you take the tomato out of the boiling water, immediately put it in cold water so the tomato can cool down and you can remove the skin and core with ease.
After you have scalded all the tomatoes, let them cool, now you need to remove all the skin.
Once the skins are removed, you want to puree the tomatoes in a blender until you have a smooth consistency.
Next, pour the tomato puree in a pot, add the chili base mix and two tablespoons of sugar.
Bring to a boil and then let it simmer for 25 minutes or until you get a good solid thickness.
While the tomatoes are simmering, I get my water bath ready, as it takes a few minutes for the water to heat up, put the lids for the jars in a little bit of water and heat to a boil and put my quart size jars in the oven to heat up at 170 degrees.
By the time your tomatoes are done simmering, everything else will be ready for processing. Ladle the chili base in the jars, wipe the outside off, attach the lids and seal the jars, just not too tightly.
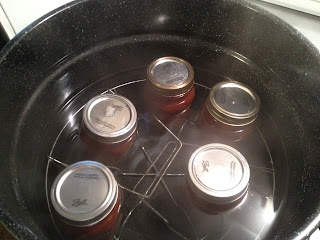
Finally, put the jars in the water bath, bring to a low rolling boil and process the jars for 40 minutes. When they are done, put the jars on a towel and let cool so they will seal. You will hear them go "ping" when they have sealed.
Always put the year on top of the jar along with what is in it. Example: Chili Base 2012.
And there you have it! Not to hard to do! There is nothing better than having homemade food in the winter. Go ahead and try it!


We bought some of the Mrs. Wages packets and I was searching for a homemade version. Every post I find about canning chili base uses the Mrs. Wages packets. I guess I will just stick with those :) I am new to canning and can not wait for the tomatoes to ripen so I can make some chili base. You have wonderful pics!
ReplyDeleteThank you so much. When I first started out, I wanted to make my own base, but quickly decided the pre-made packets were easier to use. We love the chili base!!! Good luck...let me know if you have any questions, I would be glad to help:)
DeleteThank you so much. When I first started out, I wanted to make my own base, but quickly decided the pre-made packets were easier to use. We love the chili base!!! Good luck...let me know if you have any questions, I would be glad to help:)
DeleteI used Mrs. Wages for Chili Base last year, but I can't find it in my stores this year. I am going to use Chili Seasoning and add my own onions and peppers. I hope it turns out at good at Mrs. Wages!
ReplyDeleteI was wondering if you ever added jalapeños. How much would you think per batch?
ReplyDeleteThank you SOOO much for the picture instructions. This is wonderful.
ReplyDelete